WordPress Multisite is a powerful, but hidden, WordPress core feature that lets you create an entire network of sites powered by a single WordPress installation.
In some situations, it can offer you a much more streamlined, efficient way to manage multiple WordPress sites.
But WordPress Multisite can be a little tricky and requires special considerations, which is why we’re here to help with this huge WordPress Multisite tutorial.
Over the next ~4,000 words, we’ll answer these questions:
- What is WordPress Multisite? You’ll learn what it is, how it works, and when it’s a good idea to use WordPress Multisite over individual WordPress sites.
- How do I enable Multisite in WordPress? You can follow our detailed, step-by-step tutorial to set up your own WordPress Multisite install.
- How do I use the Network Admin dashboard? You’ll learn how to manage your network of sites, including how themes and plugins function on a Multisite network.
- Can I use standalone domains for separate network sites? Yes – it’s called WordPress Multisite domain mapping, and you’ll learn how to set it up.
- Are there WordPress Multisite plugins to help with managing a network? Yup, and we’ll share some of the best.
There’s a lot to cover, so let’s dig in, starting with a deeper answer to the question of “what is WordPress Multisite?”
What Is WordPress Multisite? Key Aspects Explained in Detail
Once again – WordPress Multisite is a core WordPress feature that lets you create a network of separate-but-connected WordPress sites.
WordPress.com is probably the most popular example of Multisite in action. Each site – e.g. yourblog.wordpress.com – is a separate site inside the network of WordPress.com.
You can make your network public – like WordPress.com – so that anyone can sign up and create their own site. Or, you can keep things private, where only you or other authorized users can create new network sites.
When you set up your own network, you’ll be able to create separate websites using:
- Subfolders – e.g. www.gowp.com/site1, www.gowp.com/site2, etc.
- Subdomains – e.g. site1.www.gowp.com, site2.www.gowp.com, etc.
- Separate domains – e.g. site1.com, site2.com, etc. (this requires some tweaks, though, which we’ll cover in the WordPress Multisite tutorial later on).
However, rather than creating a separate WordPress install for each site, all of the network sites will use the same WordPress install, database, plugins, and themes. This makes for more streamlined administration, especially if your network sites are similar in nature and needs.
As the network administrator, you’ll get a new Super Admin user role which will let you manage every single site on the network. However, you’ll also be able to create separate Admins for each individual network site.
How Do I Use WordPress Multisite?
Well, we’ll cover the nitty-gritty details later in this post, but here’s a quick rundown on how you use WordPress Multisite.
To get started, you’ll just create a fresh WordPress install like you would for a single WordPress site.
Then, you’ll need to make some tweaks to your wp-config.php file to enable WordPress Multisite. After that, you can run the Multisite setup tool from your WordPress dashboard to finish things out.
From there, you’ll be able to manage your entire network from a new Network Admin dashboard, which looks like the regular WordPress admin dashboard, but has a whole new set of options.
A Quick Rundown on the Under-the-Hood Aspects Of WordPress Multisite
We don’t want to get too bogged down in the technical aspects of WordPress Multisite, but it is important to quickly cover how WordPress Multisite functions when it comes to your database and file uploads.
See, if you created multiple separate WordPress installs, each install would get its own separate database.
However, with WordPress Multisite, all of your network sites share the same database. To accomplish this, WordPress will duplicate certain tables for each network site.
Beyond the database structure, there’s also the issue of file uploads for each network site.
With a single WordPress site, WordPress stores file uploads in the wp-uploads folder. WordPress Multisite also stores files there, but will add a sub-folder for each network site.
WordPress Multisite vs Multiple Sites on WordPress: Which Should You Use?
WordPress Multisite is a hammer, but not every situation is a nail. That is, it’s a helpful feature, but it’s not the right tool for every single situation where you need to manage multiple websites.
So when it comes to using WordPress Multisite vs multiple sites on WordPress, which one should you use?
WordPress Multisite is a great choice when you’re building a network of sites that will all have similar functionality. Some examples are:
- A business with a separate network site for each physical location
- A real estate agency with a separate network site for each agent
- An Intranet where each department in a company has its own separate site
- A university with a separate network site for each department
- A web design portfolio or demo showcase (for example, many WordPress theme companies use WordPress Multisite to handle the demo sites for individual themes)
In all of these situations, WordPress Multisite lets you benefit from having separate sites while making it much easier to manage all your sites because all of the sites will have similar functionality (and need similar plugins/themes).
Additionally, WordPress Multisite is the tool for the job if you want to let other people create their own sites on your network, like your own niche version of WordPress.com.
Here’s when WordPress Multisite is not the tool for the job, though:
- Super small networks – if you only have 3-4 sites, you’ll probably be better off just using a tool like InfiniteWP, ManageWP, or MainWP to manage separate single site installs from a unified dashboard.
- Managing client sites – while some freelancers advocate using Multisite for client sites, a big potential issue is that all of your clients’ sites share the same database. Not only does this cause security/privacy issues, but it’s also a pain to export a single site if your client wants to leave in the future. Again, a tool like InfiniteWP or ManageWP is probably a better option for managing client sites.
- Large network, but completely different site needs – if you have a large network, but the sites share little to no similarly in terms of themes, plugins, etc., you might just want to keep them as separate installs rather than trying to fit all that disparate functionality into a single Multisite network.
- Different resource usage – if you have one network site that uses a ton of resources, that will affect all the other network sites, even if those sites use very few resources. Separating out the high-traffic site lets you create a more optimized hosting environment for both the high-traffic and low-traffic sites.
WordPress Multisite Adds a Super Admin User Role
By default, WordPress has five user roles, which control what individual users can and cannot do when logged into WordPress. Learn more about WordPress user roles.
WordPress Multisite adds a sixth user role – Super Admin.
The Super Admin can manage every single site in the Multisite network and choose which themes and plugins are available.
Each individual network site also gets a regular Admin user. However, these regular admins have less power than they would have with WordPress single site. For example, regular admins cannot install new themes or plugins.
How Do Themes and Plugins Work on WordPress Multisite?
With WordPress Multisite, you can still install themes and plugins like you would with a single site install. However, there are some differences.
First, only Super Admins can install new plugins and themes. Individual network sites cannot install their own plugins and themes.
When you install new plugins and themes, you’re essentially defining the pool of themes and plugins that are available to individual network site admins.
You can then:
- Give individual network sites the option of whether or not to activate a plugin or theme
- Force activate themes or plugins for all network sites
We’ll show you how this works in more detail later.
As for WordPress Multisite compatibility for plugins, many regular WordPress plugins should work with WordPress Multisite. However, not all plugins are guaranteed to work.
If possible, you’ll want to look for plugins that specifically mention Multisite compatibility. Or, make sure to test plugins on a staging site before making them live on an active Multisite Network.
Do You Need Special WordPress Multisite Hosting?
There are no special requirements to host WordPress Multisite and most of the time you can use WordPress Multisite on any host that lets you host WordPress.
However, remember that you’re creating a network of sites. So even though you’re technically just using “one” WordPress install, each site will have its own data and receive its own traffic.
As a result, you’ll probably use more resources, and you might want to spring for more than just budget hosting.
Beyond that, there are still some things to consider.
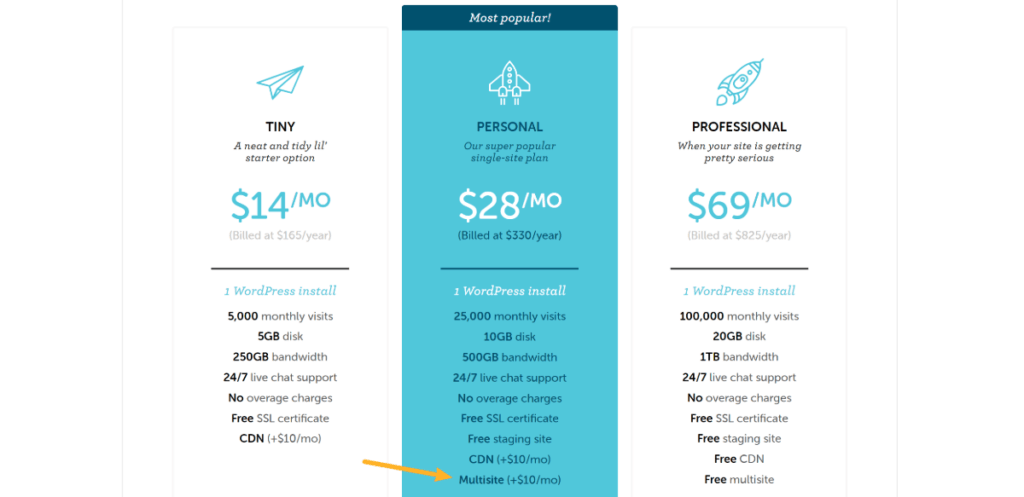
First, some managed WordPress hosts will charge you extra to use WordPress Multisite. For example, if you want to use WordPress Multisite on the cheaper hosting tiers at Flywheel, you’ll need to pay an extra $10 per month (it’s free on higher tiers):
Second, some managed WordPress hosts give you a one-click install tool for WordPress Multisite. For example, Kinsta lets you install WordPress Multisite right from the get-go:
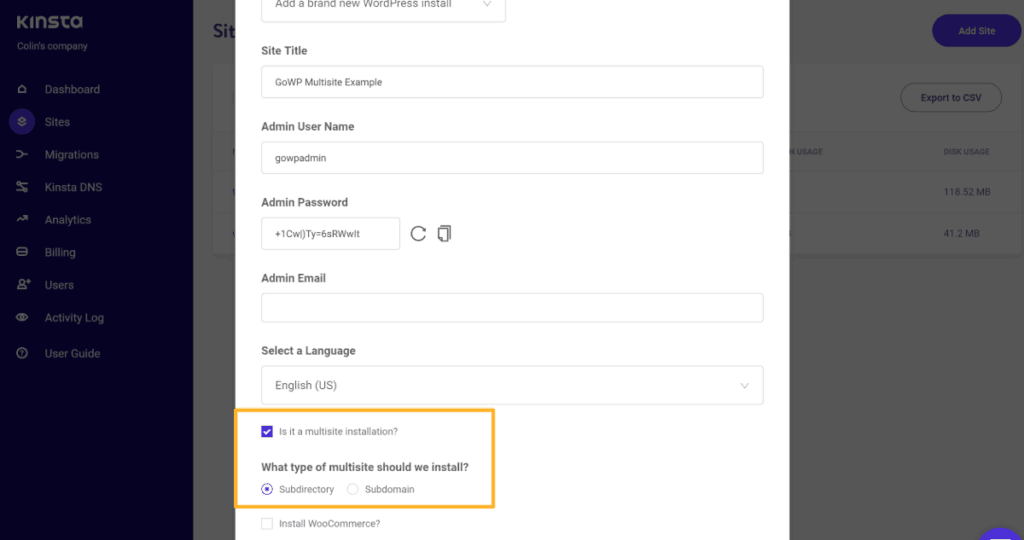
Now, it’s not too difficult to install WordPress Multisite yourself (we’re going to show you how), but this is a nice bonus that will save you some work.
How to Set Up WordPress Multisite: Step-by-Step Guide
Now that you know what WordPress Multisite is and whether it’s right for your situation, let’s dig into how to set up WordPress Multisite.
Here’s a high-level look at the steps that you’ll follow in this tutorial:
- Create a fresh WordPress install
- Enable Multisite in wp-config.php file
- Run Network Setup tool
- Add some code snippets to wp-config.php and .htaccess files
Step 1: Create A Fresh WordPress Install
To get started, you’ll want to create a fresh, clean WordPress install for your Multisite network. You can add Multisite to an existing site, but it’s simpler to avoid that if possible.
You can use whatever method you would normally use to install WordPress for a single site. For example, the autoinstaller at your host is totally fine.
Step 2: Enable WordPress Multisite in wp-config.php
While WordPress Multisite is a core WordPress feature, it’s not activated by default. To activate it, you need to add a line to your wp-config.php file.
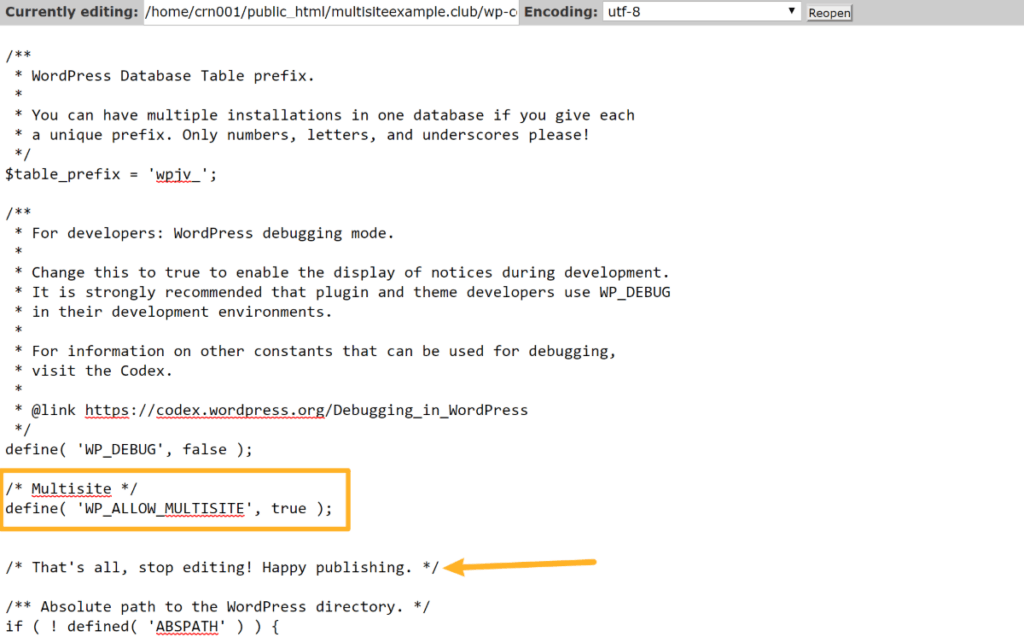
To do that, use FTP or cPanel File Manager to edit your wp-config.php file. Then, find this line:
/* That's all, stop editing! Happy publishing. */
And add the following code snippet above that line:
/* Multisite */
 define( 'WP_ALLOW_MULTISITE', true );
Here’s what it looks like in cPanel File Manager:
Step 3: Run Network Setup Tool
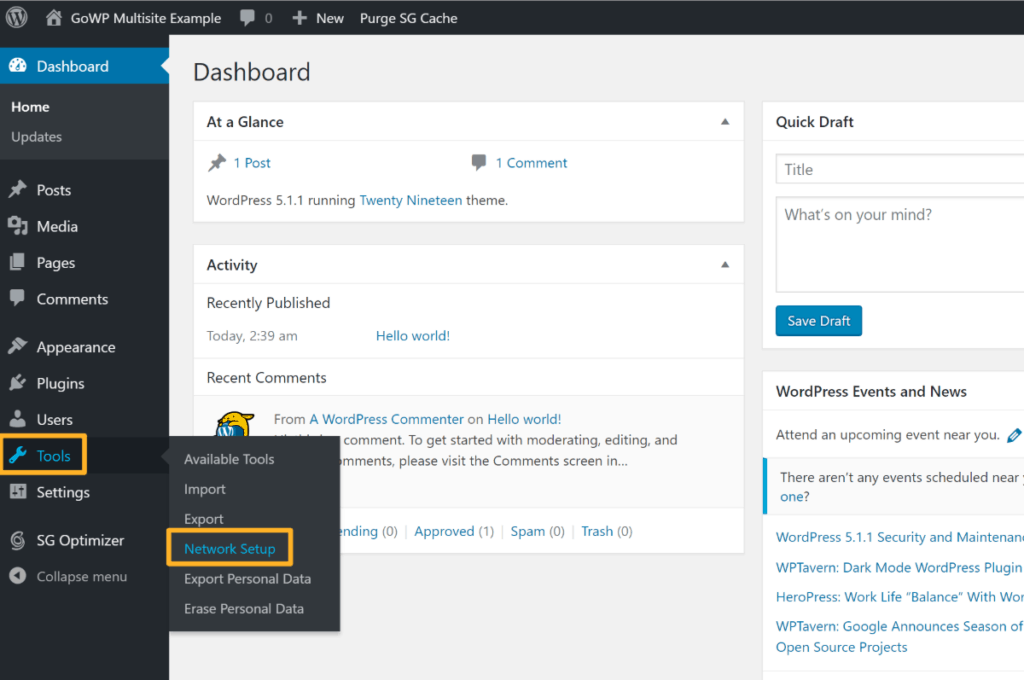
Now, open the WordPress dashboard admin for your site (or refresh it if you already have it open).
Then, go to Tools → Network Setup (with the previous step, you made this area available):
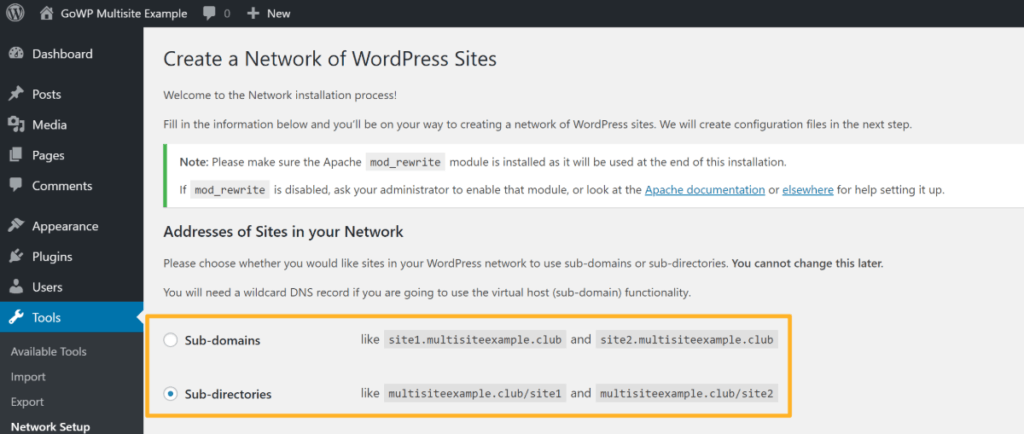
Now, you’ll need to make some choices.
First, you’ll choose the URL structure for the individual sites in your network. You have two options:
- Sub-domains* – each site gets its own separate subdomain – e.g. site1.multisiteexample.com
- Sub-directories – each site is in its own folder – e.g. multisiteexample.com/site1
*If you choose sub-domains, you’ll need to perform one extra step to get things working. We’ll cover that in a second.
If you want to use separate domains for each site – AKA domain mapping – choose the sub-directories option for now – we’ll cover the process of using domain mapping later on.
Think very carefully about this choice because you cannot change it later. There’s no right or wrong answer – it really just depends on your preferences:
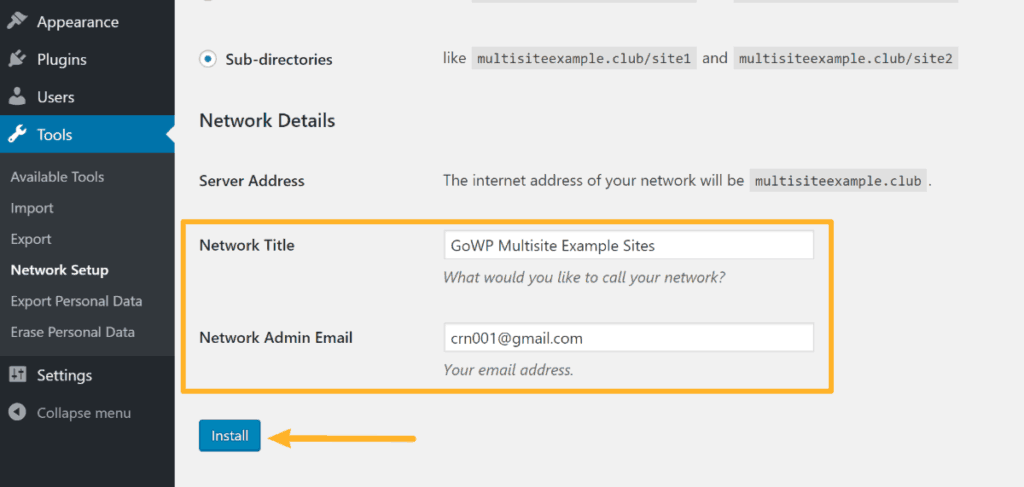
Below that, you can choose the Network Title and Network Admin Email.
Once you’ve made your choices, click Install:
Step 4: Add Code Snippets to wp-config.php and .htaccess Files
On the next screen, WordPress will give you two different code snippets:
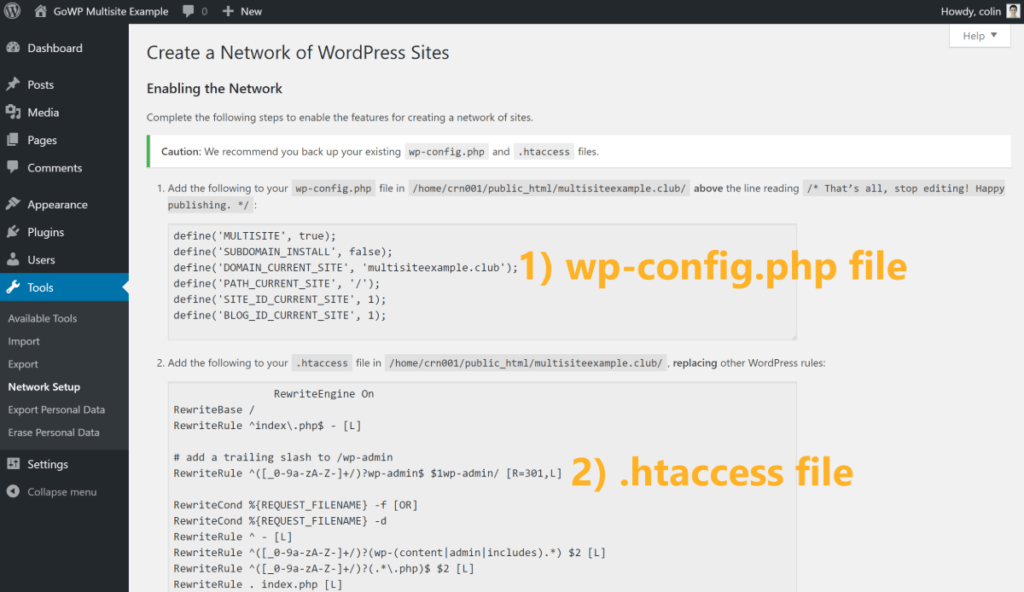
You need to add the first code snippet to your wp-config.php file. Add it right below the code snippet you added in Step 2:
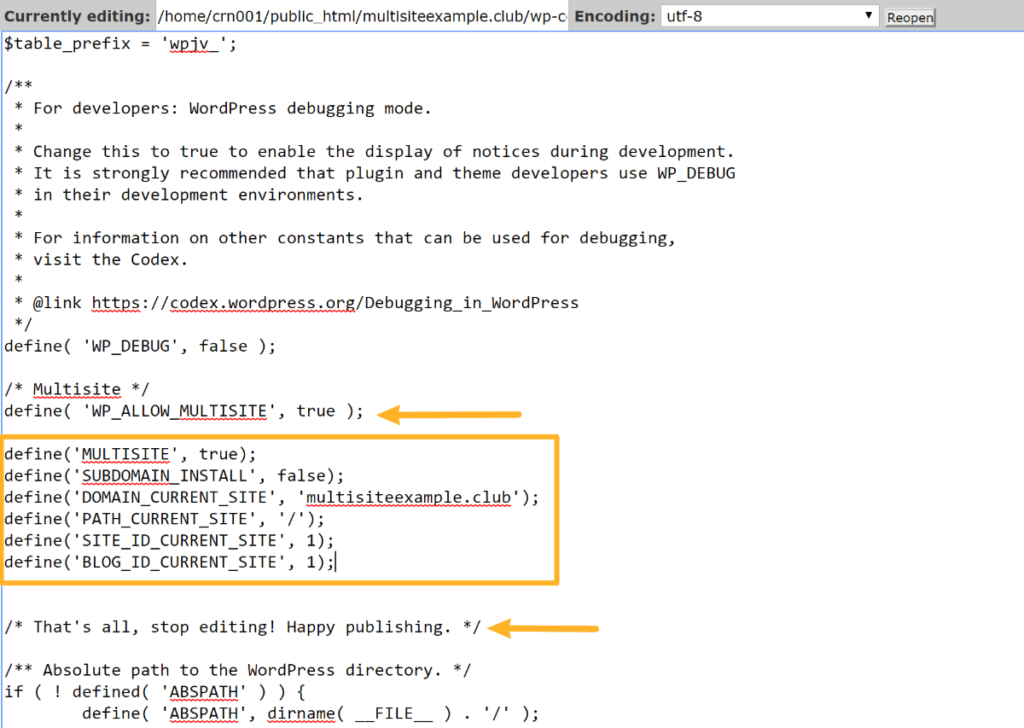
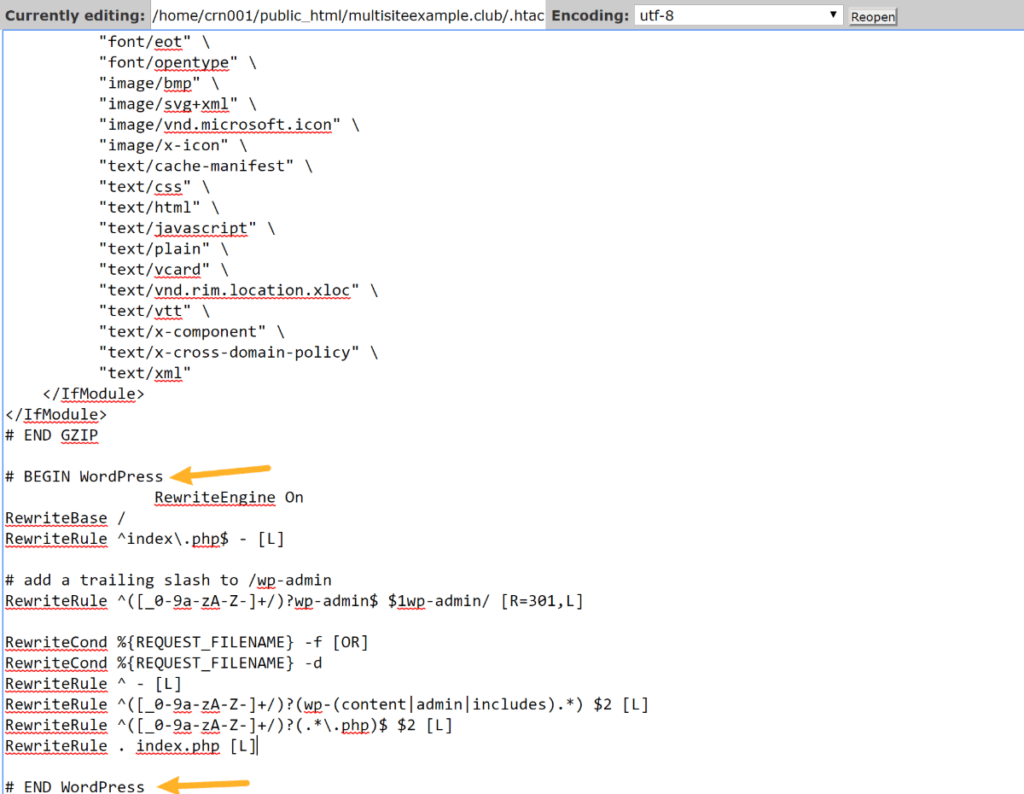
Then, add the second code snippet to your site’s .htaccess file. Replace any code between the BEGIN WordPress and END WordPress sections:
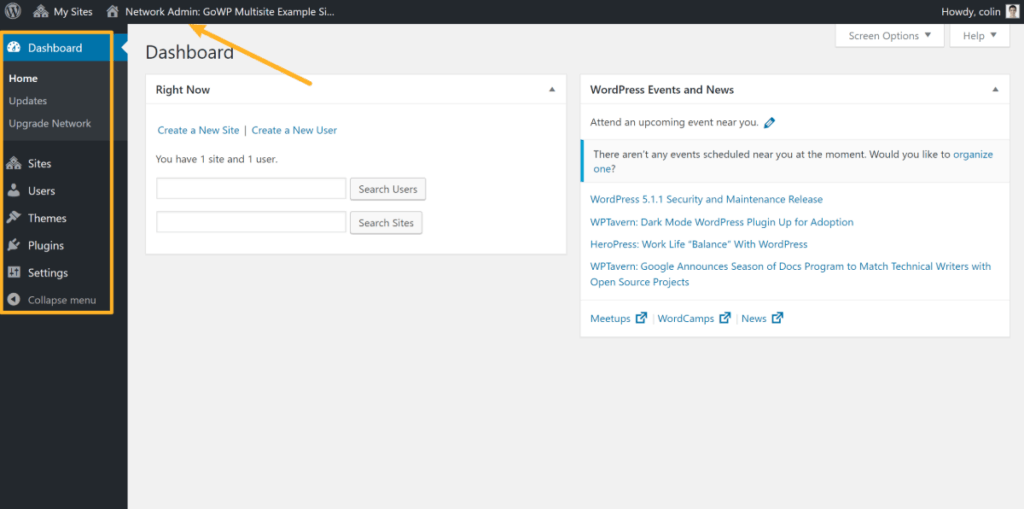
After that, you’ll need to log in to your WordPress dashboard again. Then, you should see the WordPress Multisite Network admin dashboard:
We’ll show you how to use this dashboard in a second, but first, we need to cover a little housekeeping in case you decided to use sub-domains for your network sites.
If Using Sub-Domains, Add a Wildcard DNS Rule
This step only applies if you chose to use sub-domains for your network. That is – site1.multisiteexample.com.
In order to make the subdomains work, you need to set up something called a wildcard DNS record at your host. This lets WordPress dynamically use subdomains for each network site.
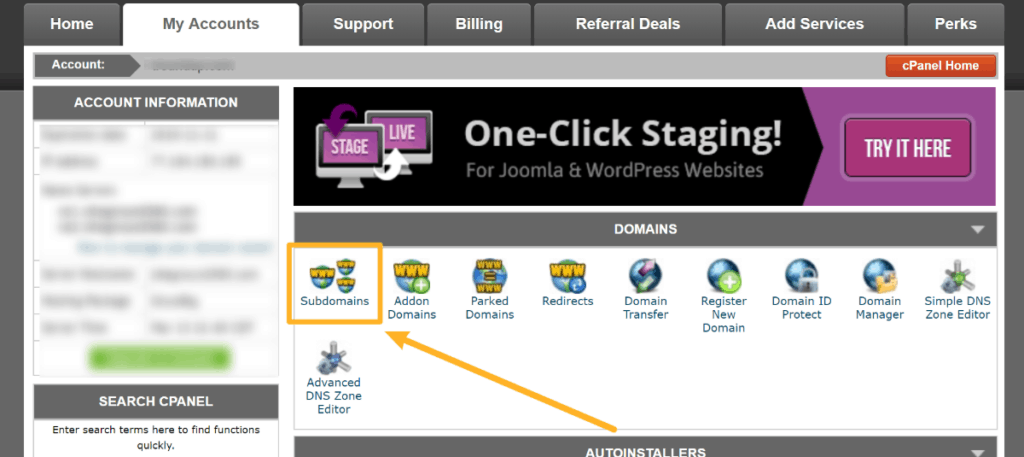
If your host uses cPanel, the process is pretty painless.
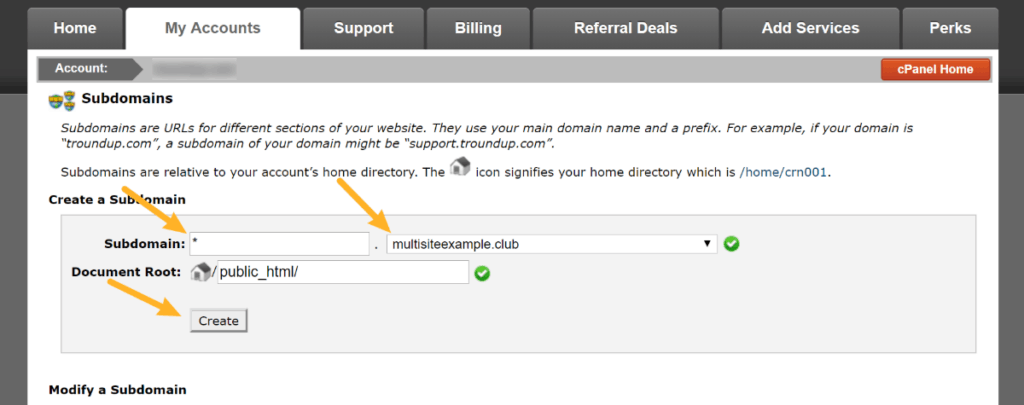
Open your cPanel dashboard and find the Subdomains option:
Then, choose the domain name for your base WordPress Multisite install from the drop-down, add an asterisk (*) to the Subdomain field, and click Create:
If your host does not use cPanel, we recommend reaching out to your host’s support for help.
How to Use the WordPress Multisite Network Admin Dashboard
Now that you’ve set up WordPress Multisite, let’s cover how to use your new Super Admin privileges in the Network Admin dashboard.
In addition to helping you manage your network, this is also where you can set up WordPress Multisite domain mapping, which we’ll show you after we give you a tour.
A Quick Tour of the WordPress Multisite Network Admin
The Network Admin dashboard is where you’ll manage your network. It looks a lot like the regular WordPress dashboard – just with different options.
You can access it by going to yoursite.com/wp-admin/network/.
Then, you’ll use the menu options in the sidebar to manage your network:
Configuring Basic Network Settings
First up, you’ll want to configure some basic settings for your network, like whether or not guests can register and create their own sites.
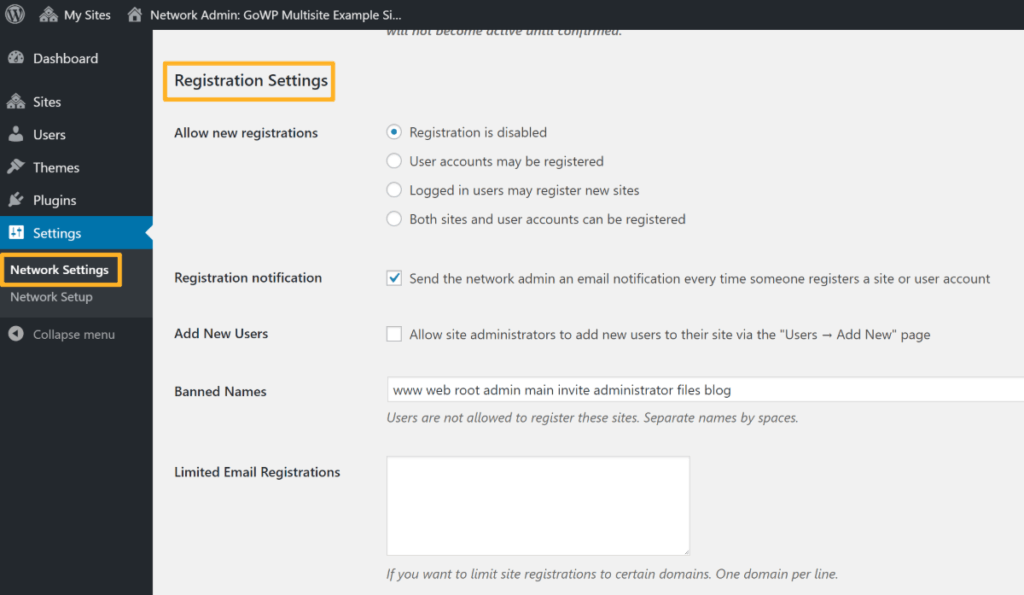
To access these settings, go to Settings → Network Settings.
In the Registration Settings section, you can choose:
- Whether or not to allow new user registrations
- Whether those users can create their own sites
You can also choose smaller settings below that:
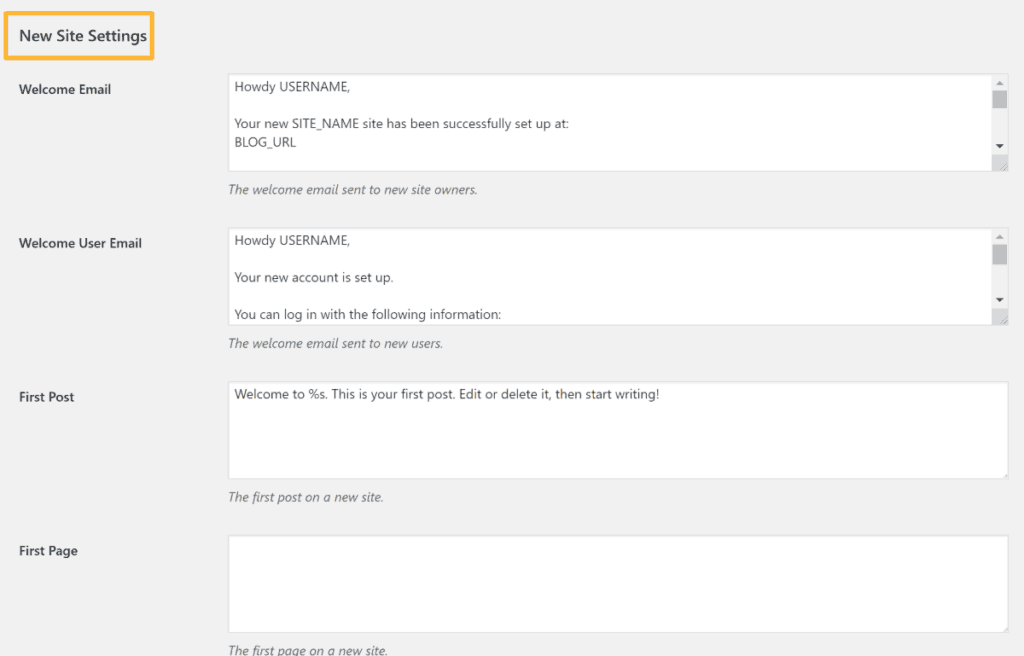
Further down, the New Site Settings let you configure the defaults for each new network site. For example, you can change the text of the default “Hello World!” blog post that all new WordPress installs start with:
And at the bottom, you can configure some other miscellaneous features, like how much upload space each network site gets:
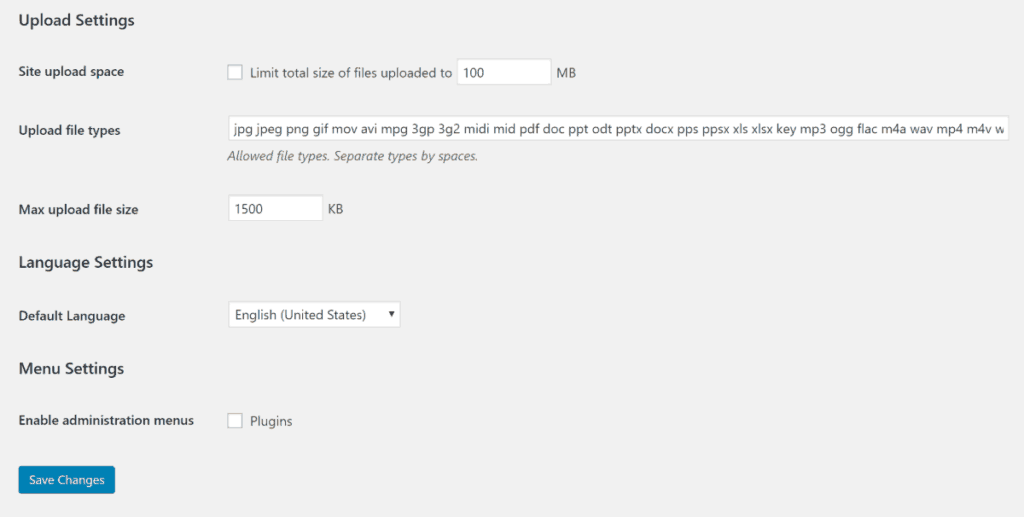
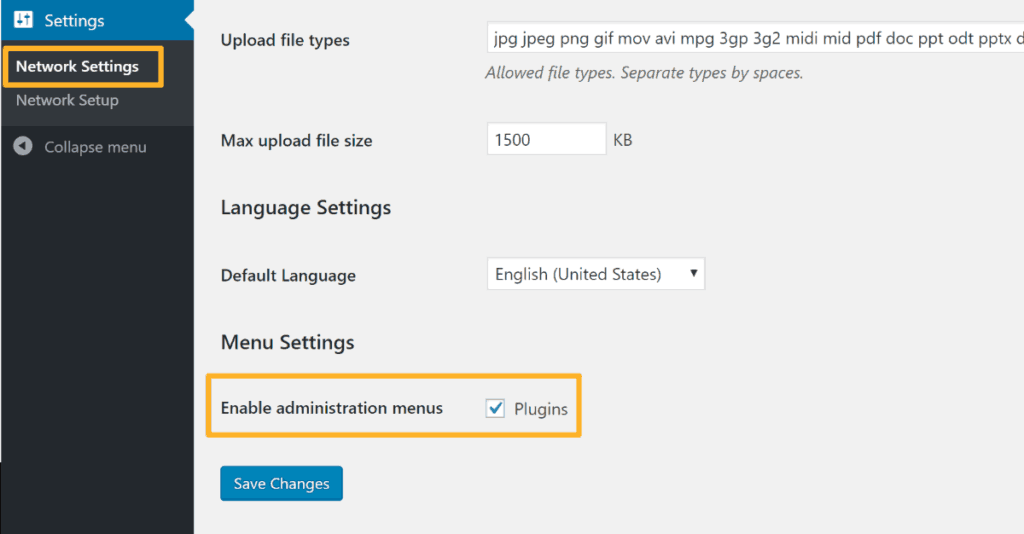
Here, the Enable administration menus option is an important choice. If you check the box for Plugins, individual network site admins will be able to view the Plugins area and manually enable or disable certain plugins (you can choose which plugins they have control over – more on this in a second).
No matter what you choose, individual site admins cannot install their own plugins.
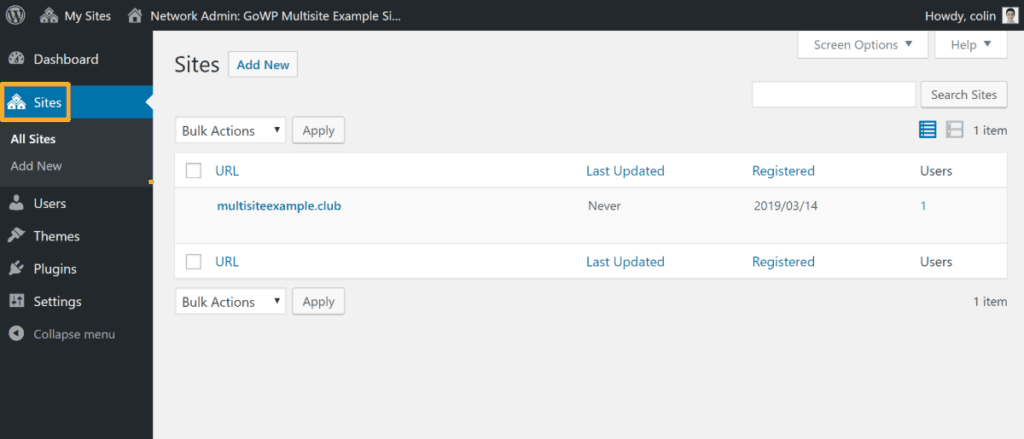
Managing and Adding Network Sites
The Sites tab lets you see a list of all your network sites and manually add new network sites.
When you first install WordPress Multisite, you only have one site – your core WordPress install:
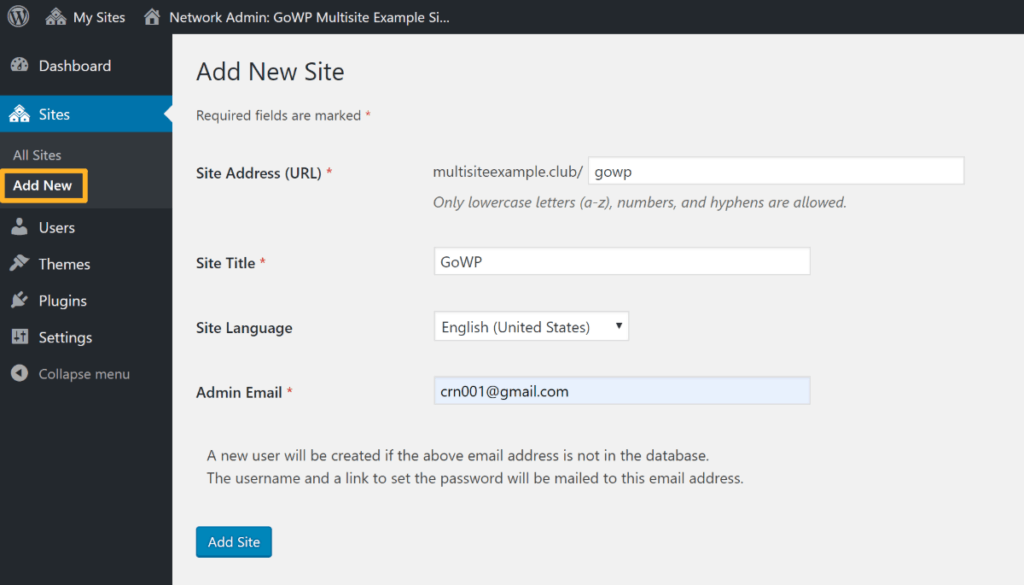
To add a new site, go to Sites → Add New.
Here, you can:
- Choose the URL (according to your URL structure preferences)
- Configure basics like title, language, and admin email
If a user with the admin email doesn’t exist, WordPress will automatically create one:
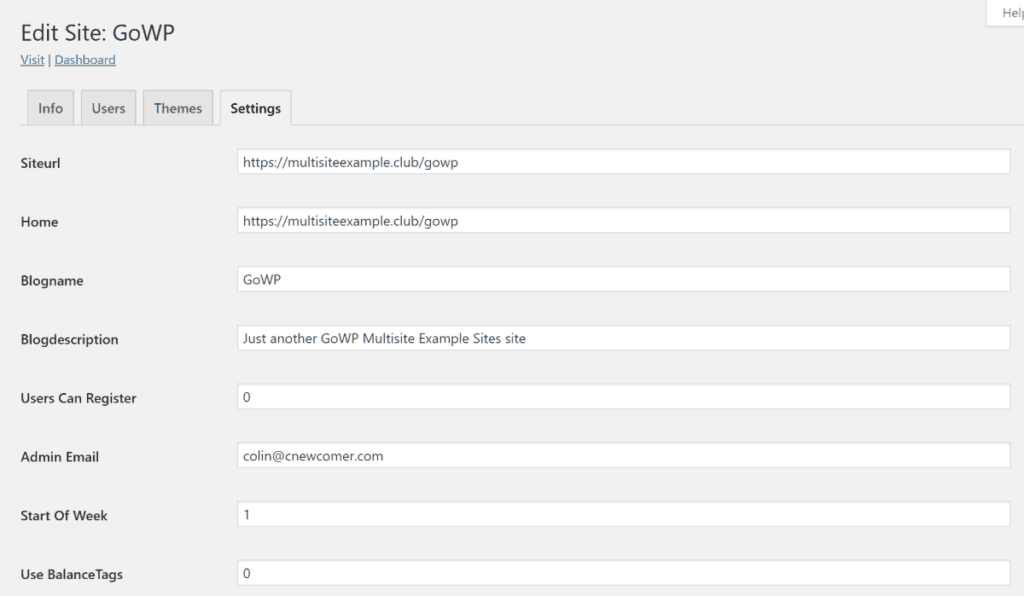
Once you add a site, you can edit it to view more options, like its settings, users, and themes:
Installing and Enabling Themes
To install new themes on your Multisite network, you’ll use the Themes area.
There are two parts to installing a theme:
- Actual installation – you can install a theme just like you would on a single site WordPress install
- Network Enable – this lets individual network site admins choose the theme
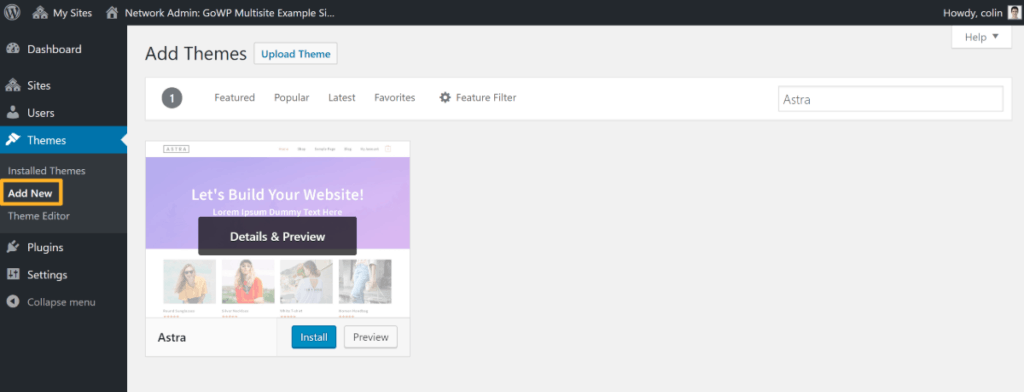
For example, let’s say that you want to install the Astra theme on your network, which is the theme we use here at GoWP.
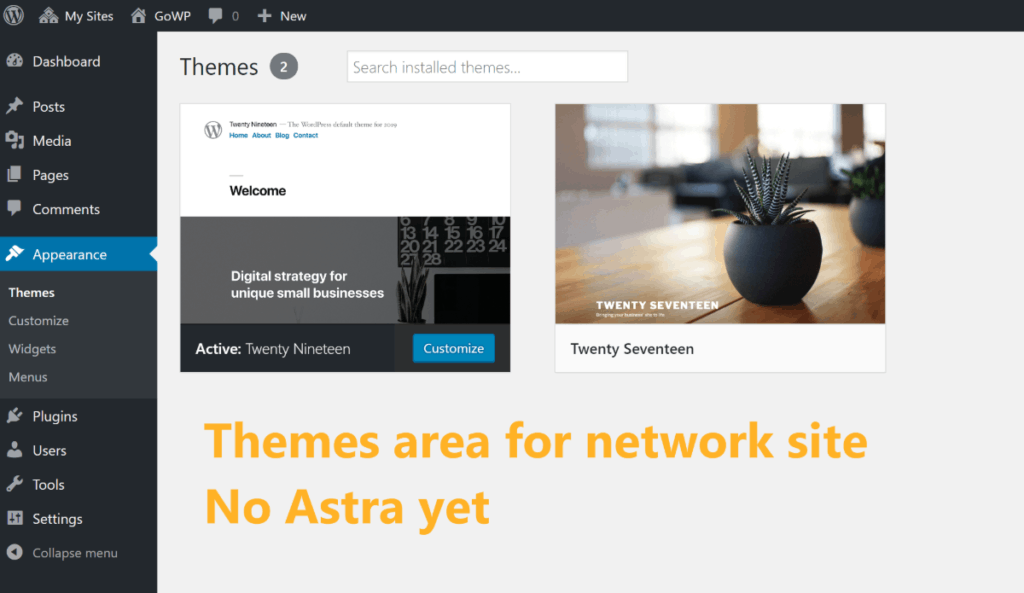
First, you would go to Themes → Add New and install the theme:
However, if we were to switch to a regular admin user on a network site, you can see that individual site admins cannot activate Astra on their network site yet:
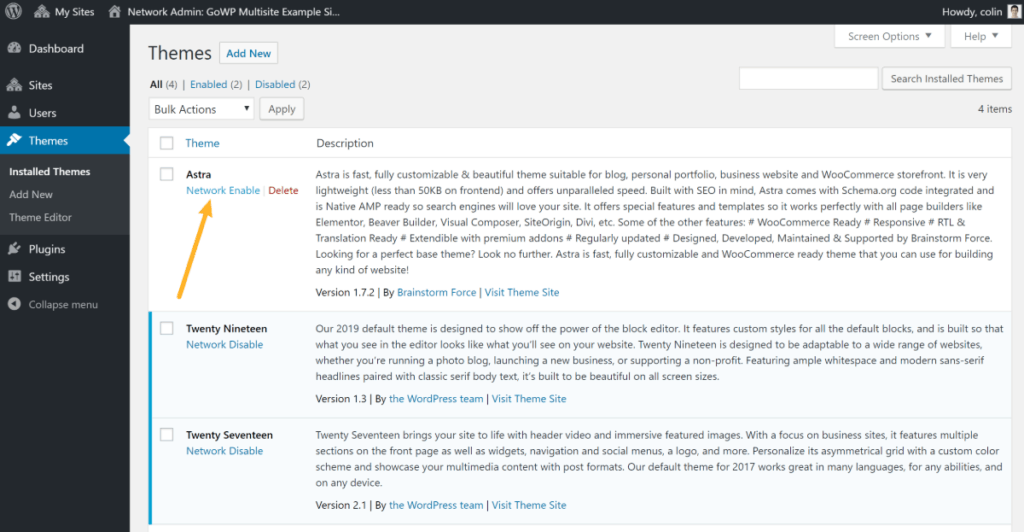
To make the Astra theme available as a choice for all network sites, you need to Network Enable it from the Themes area in your Network Admin:
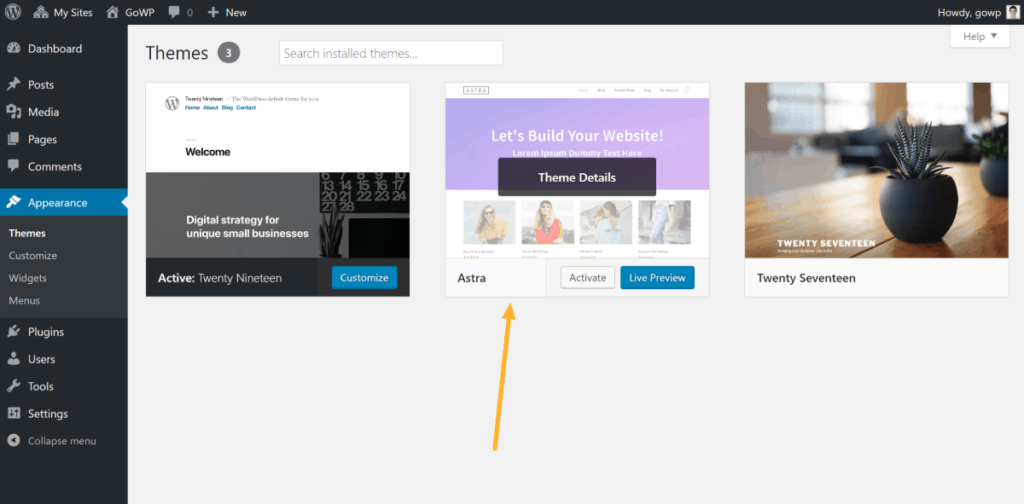
Once you do that, individual site admins can now choose the Astra theme for their network site:
Installing and Enabling Plugins
The Plugins area of the Network Admin lets you perform similar actions for plugins. That is:
- You can install plugins as you normally would by going to Plugins → Add New
- You need to Network Activate them to make them live on your network
However, there are also some differences.
With themes, Network Enable makes the theme available to individual sites, but it does not force them to use a specific theme.
However, when you Network Activate a plugin, you’re forcing it to be active on every single network site.
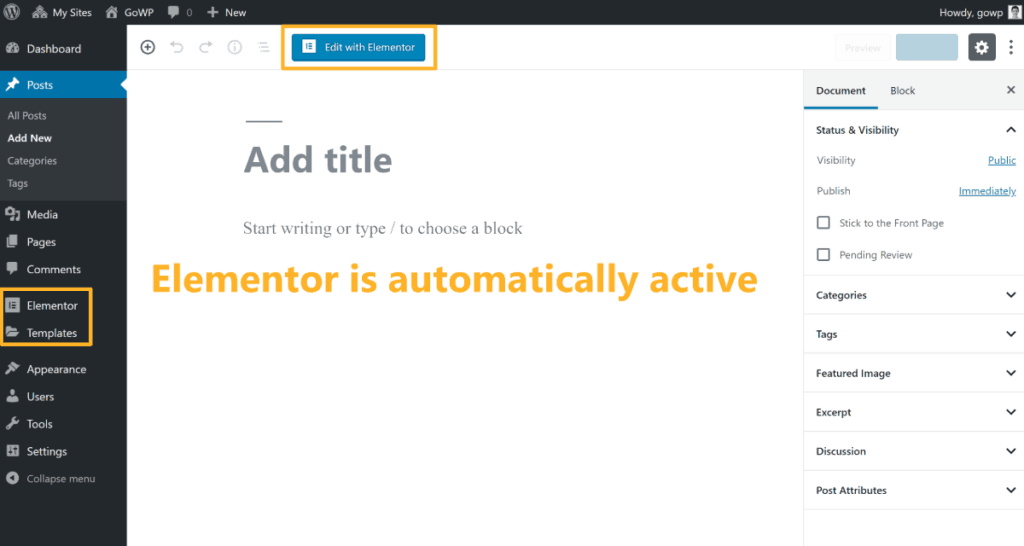
For example, if we install and network activate the Elementor page builder plugin
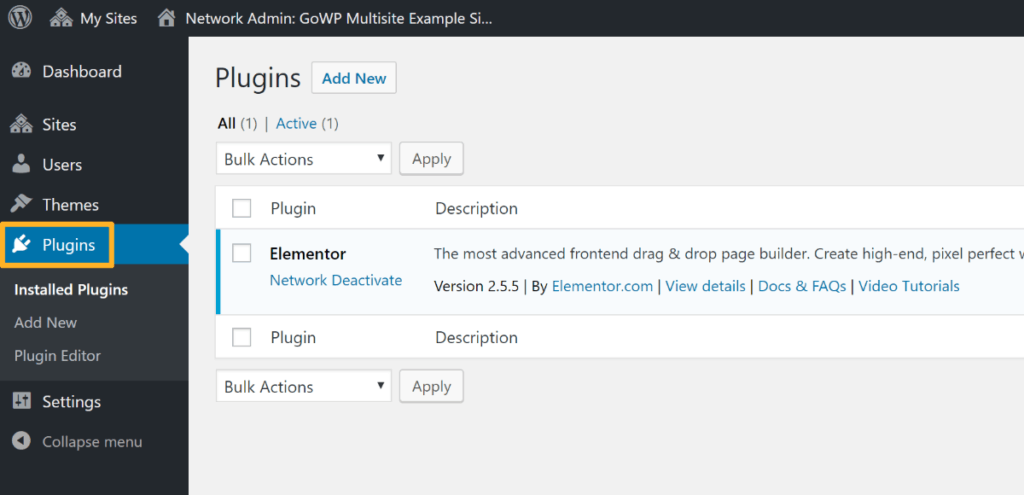
Then, it’s automatically active on every single network site – the individual site owner has no choice in the matter:
There’s another way to handle it, though.
If you enabled the plugin administration menu in the network settings:
Then, individual site owners can choose whether or not to activate certain plugins.
Here’s an example.
Let’s say that you install two plugins from your Network Admin dashboard:
- Elementor – installed and network activated
- WPForms Lite – installed but not network activated
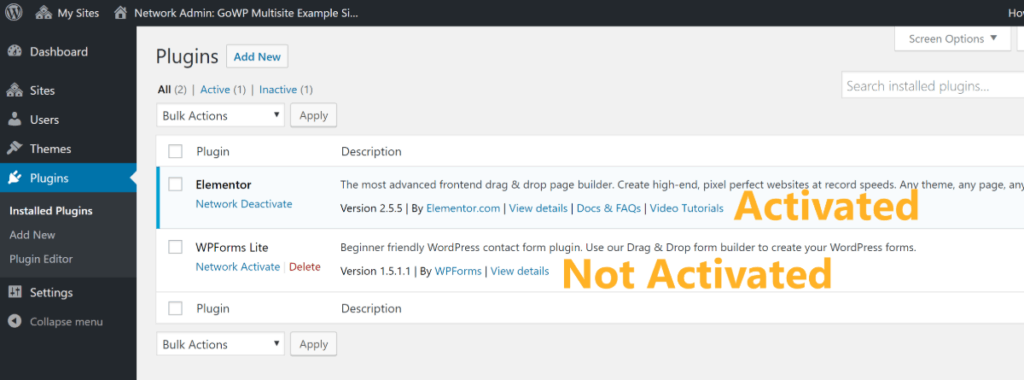
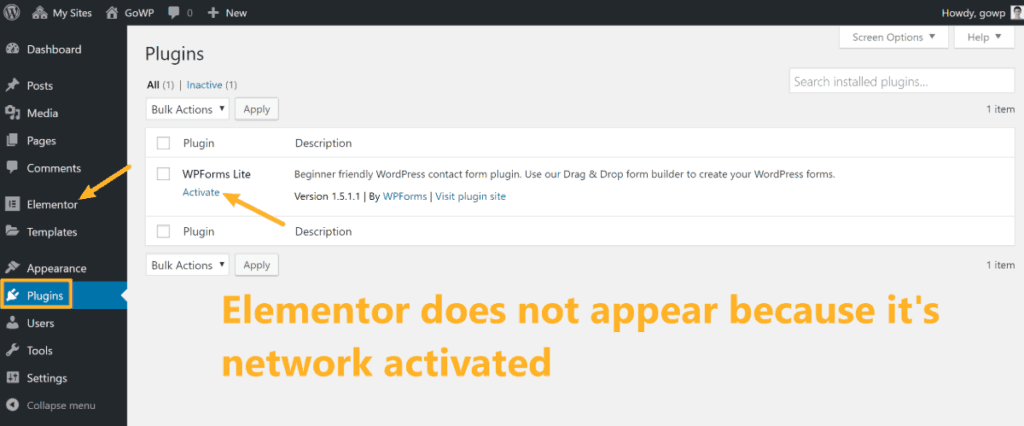
Now, Elementor is still automatically active on all network sites. However, individual network site admins can use their own Plugins area to choose whether or not to activate WPForms Lite:
Essentially, you can:
- Be a dictator and control exactly which plugins are active on every site
- Let individual network site admins choose which plugins to activate on their individual sites
- Mix-and-match the two to force some plugins to be active, while giving users the choice for other plugins
WordPress Multisite Domain Mapping Guide (Optional)
Now that we’ve shown you how the WordPress Multisite Network Admin dashboard works, let’s circle back to the concept of domain mapping that we’ve mentioned a few times.
If you need a refresher, domain mapping is where you give a network site its own standalone domain name, rather than a sub-domain or sub-directory.
Again – this WordPress Multisite domain mapping tutorial is 100% optional. You only need to follow this section if you want to use separate domains for each network site. If you’re not planning to use domain mapping, click here to skip ahead to learn about helpful WordPress Multisite plugins.
Previously, domain mapping was a complicated topic that required a separate plugin. However, as of WordPress 4.5, domain mapping is now built into the core and easier to set up from inside WordPress, though the other technical issues can still be a bit tricky.
Let’s say your main WordPress Multisite install is multisiteexample.club and you want to add a new network site at coolblog.com.
Step 1: Configure Site Address in Network Admin Dashboard
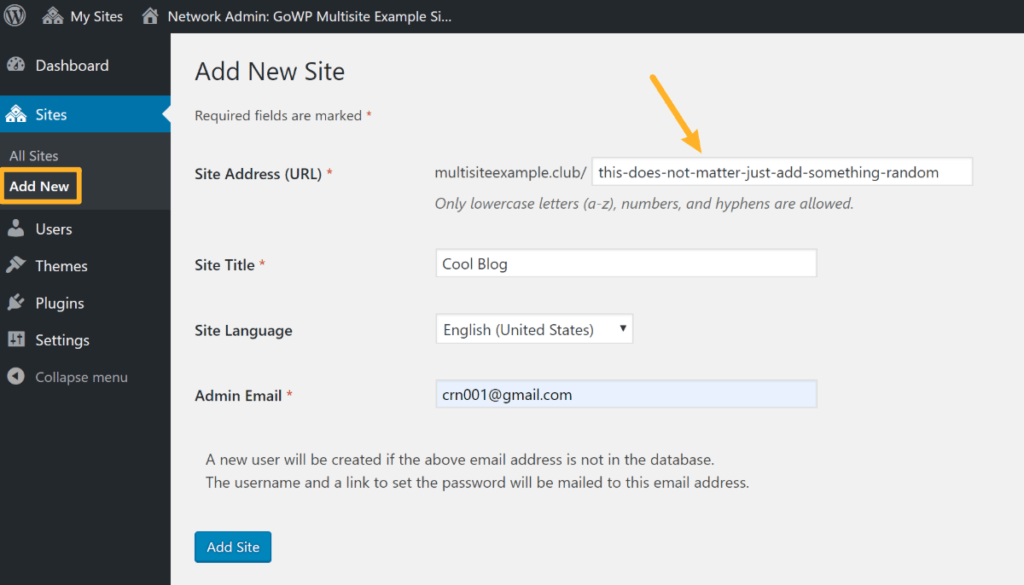
To get started, go to Sites → Add New.
Here, you’ll be forced to add the site’s URL according to your network’s settings. Enter anything in that box – it doesn’t matter right now. Make sure to fill out the other details as well. Then, click Add Site:
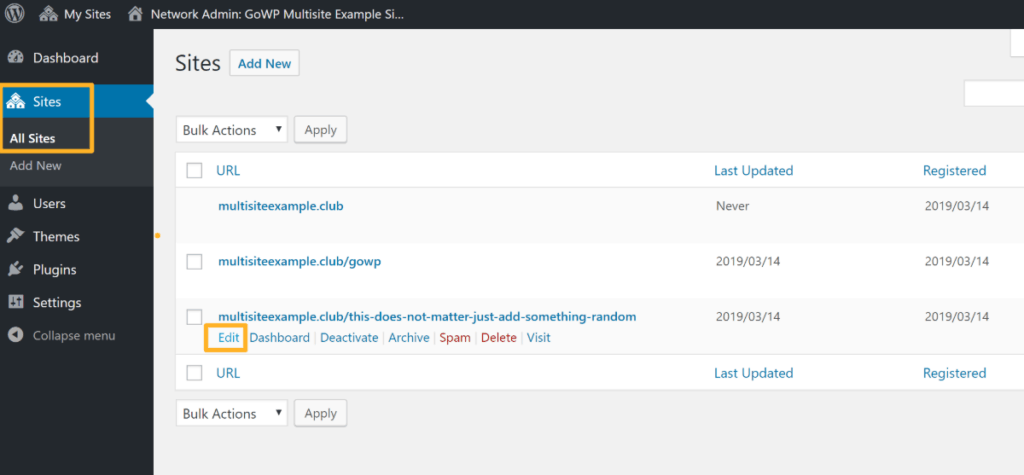
Now, go to the Sites area and Edit the site that you just created:
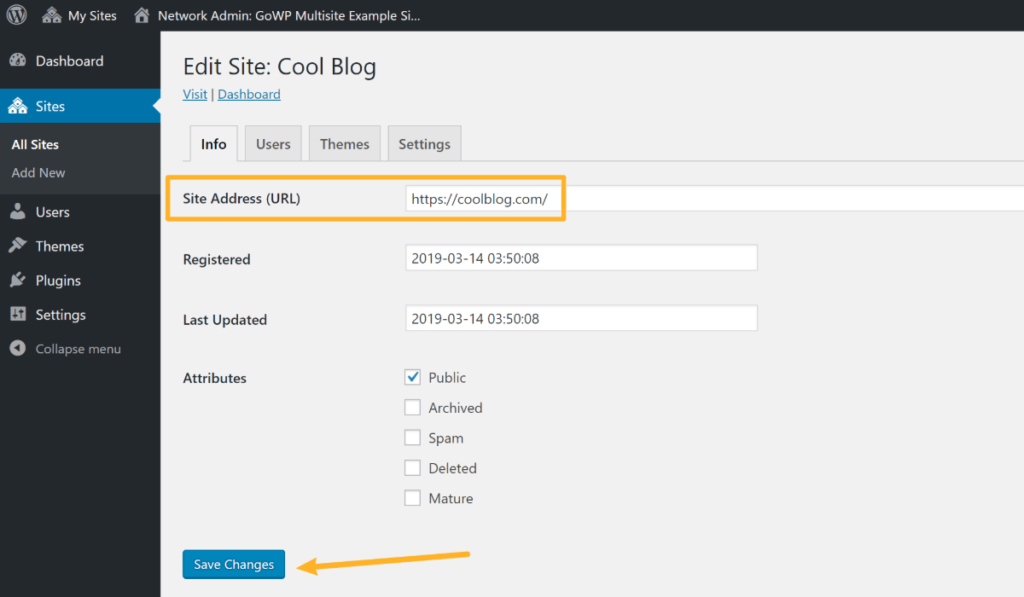
Now, you’ll be able to edit the full Site Address (URL) field. Enter the standalone domain name that you want to use and click Save Changes:
Step 2: Point Domain to Your Host’s Nameservers
Next, you need to set it up so that the standalone domain name – coolblog.com for this example – directs visitors to the WordPress network site.
You’ll do this at your host and the spot where you registered the domain name.
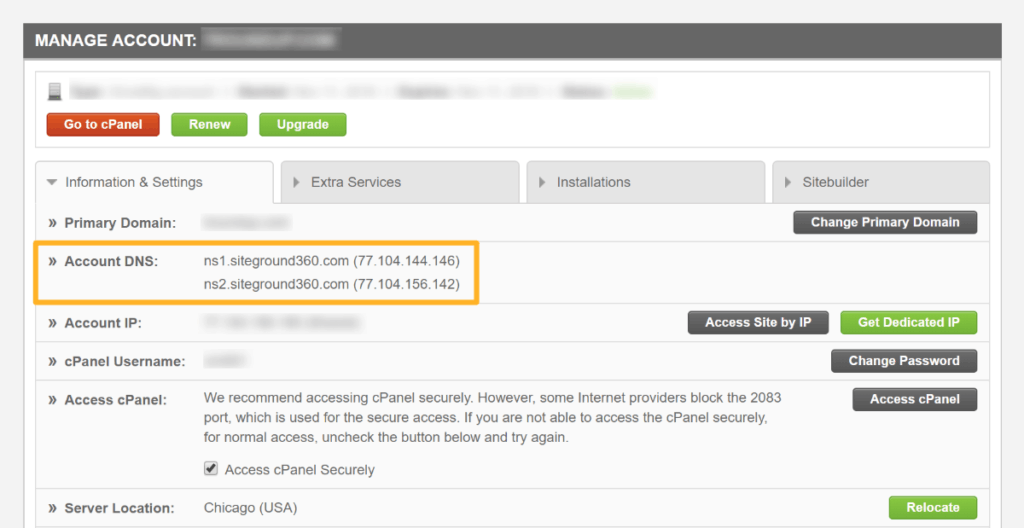
First, you need to update the domain’s nameservers to point to your host.
To do that, you’ll need to get your nameservers from your host. You can usually find this in your hosting dashboard, but you can reach out to your host’s support if you can’t:
Then, you need to go to the spot where you registered the domain name and edit the domain’s nameservers to point to your host’s nameservers. Here are some tutorials for popular domain registrars:
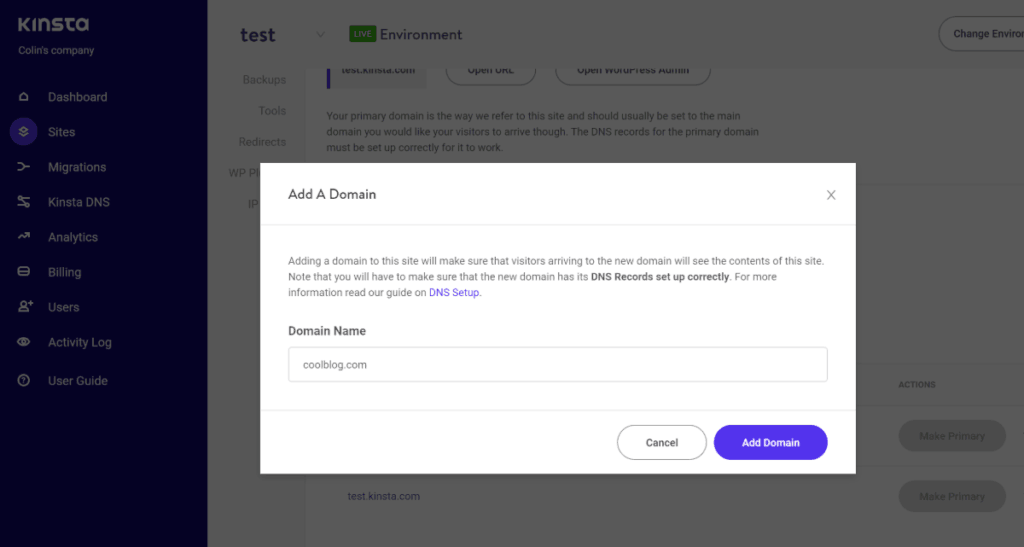
Step 3: Add Domain Alias
Finally, you need to add the domain as an alias at your host. This is what lets you connect the domain to WordPress Multisite.
Unfortunately, this process depends on your host. Sometimes it’s quite simple, while other times it can get pretty technical.
For example, at Kinsta, it’s as simple as adding the domain via the Kinsta dashboard:
Whereas other hosts require varying levels of detail. For example, some cPanel installs have a built-in tool for Alias domains, while the cPanel at SiteGround does not.
Honestly, if you’re not sure how your host handles it, your best bet here is to reach out to your host’s support and ask them to help you set up an alias domain.
Helpful WordPress Multisite Plugins to Extend Your Network
Beyond regular plugins that you can use on your network, there are also WordPress Multisite plugins built specifically to help you add new functionality to your network and/or manage your network more effectively.
Here are some of the best WordPress Multisite plugins to extend your network…
Multisite Enhancements
As the name suggests, Multisite Enhancements adds a number of enhancements for Super Admins to help manage your Multisite network.
You’ll get new helpful data in the dashboard, more menu options, and some other tweaks.
Multisite Toolbar Additions
Another aptly named plugin, Multisite Toolbar Additions gives Super Admins access to some handy new functionality from the WordPress admin toolbar.
User Switching
User Switching is a really handy plugin that lets you quickly switch between different WordPress user accounts without needing to log in/out or use an Incognito tab. This is helpful for experiencing how different users see your Multisite network (e.g. Super Admin vs Admin).
MultiSite Clone Duplicator
MultiSite Clone Duplicator lets you quickly duplicate an individual network site. Basically, you can use it to create one “master” network site and then clone that as many times as needed.
Multisite Shared Sidebar
Multisite Shared Sidebar lets separate network sites share the same sidebar. This is really handy if you’re, say, creating separate network sites for different store locations.
WP Security Audit Log
WP Security Audit Log isn’t specific to WordPress Multisite, but it’s helpful for keeping track of what’s going on with your network.
Basically, it lets you log important actions so that you can keep an eye out for any suspicious or malicious activity on your network.
Multisite Plugin Manager
Multisite Plugin Manager gives you more control over plugins on your network. You can choose which plugins to auto-activate for new blogs, assign special plugin permission rules for individual network sites, and more.
Get Started With WordPress Multisite Today!
With that, we’ve reached the end of our WordPress Multisite guide.
WordPress Multisite is not the right tool for every situation involving multiple WordPress sites, but if your needs match what WordPress Multisite offers, it can offer a much simpler way to manage and run a network of WordPress sites.
Finally, if you’d like a partner to help you manage your network of sites, our team of expert WordPress engineers is available 24/7 to make sure your network runs smooth as butter. Learn more here.